 Dynamic Occlusion (Raycasting) Component
Intro
Summary
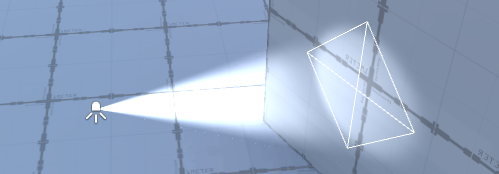
The Dynamic Occlusion features (Raycasting and Depth Buffer) give awareness to your light beams: they react to the changes in the environment. Light Beams can be blocked and occluded by 3D or 2D geometry.
 |
 |
|---|---|
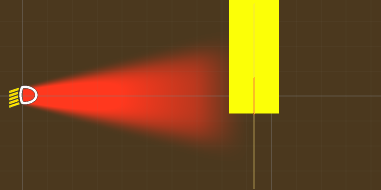
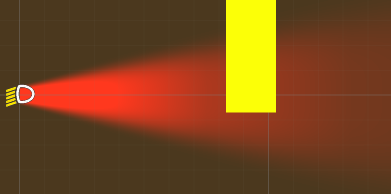
| Dynamic Occlusion OFF | Dynamic Occlusion ON |
Without this feature, Volumetric Light Beams SD are not blocked by geometry: think about it like a Light with disabled shadows. This means that if you place a light beam against a wall, the light beam could shine through it and be visible from the other side.
Which Dynamic Occlusion should I use?
The plugin supports 2 different implementations of dynamic occlusion. You might be interested in using one or the other (or both) depending on your needs.
In short, Dynamic Occlusion using the Depth Buffer provides a more precise occlusion system, while using Raycasting offers better performance and supports 2D (a 2D sprite can be an occluder).
However none of these techniques perform true volumetric shadow. To achieve this, you have to use a Volumetric Light Beam HD with a Volumetric Shadow HD component.
| Feature | Raycasting | Depth Buffer |
|---|---|---|
| Performance | +++ | ++ |
| Partial occlusion | No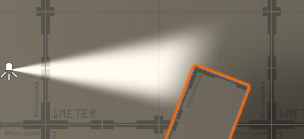 (it can only be either fully blocked or not blocked) |
Yes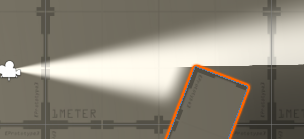 |
| Complex occluders | No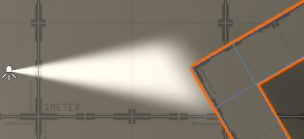 (computed using only a single virtual plane) |
Yes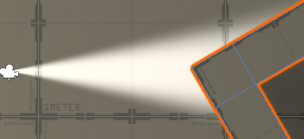 |
| Small occluders | Yes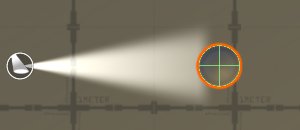 |
No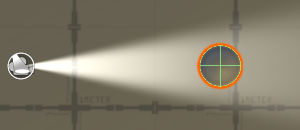 (occluders smaller than beam's radius won't be caught by depth buffer) |
| Require a Collider component on each occluder | Yes | No |
| 2D support | Yes | No |
| True volumetric shadow | No | No |
Dynamic Occlusion in Editor & Playmode
To maximize performance, when you are playing your game in the Editor, the Dynamic Occlusion will only be updated if at least one game camera looks at your beam.
This means you might see wrong occlusion effect applied on a beam in the Editor's Scene View if no game camera looks at it.
Presentation
This feature computes a fast and efficient approximation of the occlusion. Therefore, the occlusion won't be perfectly precise, but will provide satisfying results in most cases while keeping high performance even on low-end platforms.
Performance consideration
Depending on the complexity of your scene, performing regular raycasts could be performance intensive. There are some points to take into considerations when using this feature:
- Enable this feature on a light beam only if it's really necessary.
- Tweak the Layer Mask property to be as restrictive as possible.
- Tweak the Update Rate property to update the occlusion as rarely as possible.
- Tweak the X frames to wait property to prevent from performing raycasts at each frame.
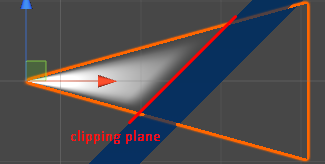
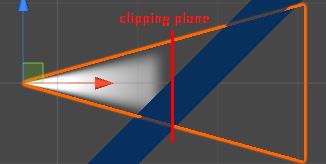
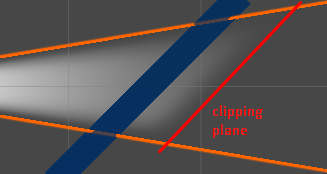
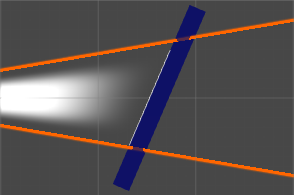
This feature relies on raycasts to be aware of potential occluders. When enabled, regular raycasts are performed in the light beam direction. If an occluder is found, a virtual clipping plane is computed from the occlusion test results, and is fed to the light beam.
Raycasts and Colliders
Since this features relies on raycasts to work, a piece of geometry MUST be represented with a physical entity for Unity in order to be considered as a potential occluder. This means a 3D Collider component MUST be attached to it (BoxCollider, SphereCollider, MeshCollider...).
Usage
The Dynamic Occlusion (Raycasting) component must be attached to a Volumetric Light Beam. You can use this button at the bottom of the Volumetric Light Beam inspector.

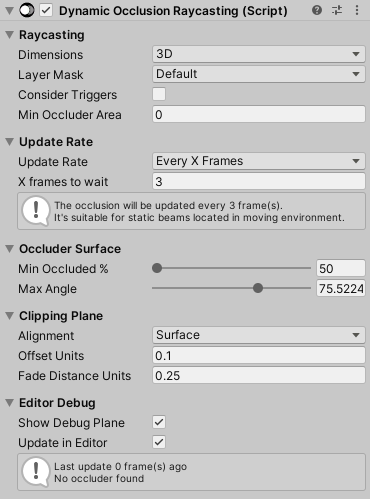
Raycasting
Dimensions
Should it interact with 2D or 3D occluders?
- 3D: the beam will react against 3D Occluders
- 2D: the beam will react against 2D Occluders. This is useful when using the beams with 2D objects (such as 2D Sprites).
Layer Mask
The beam can only be occluded by objects located on the layers matching this mask.
Performance consideration
It's very important to set it as restrictive as possible (checking only the layers which are necessary) to perform a more efficient process in order to increase the performance.
Consider Triggers
Beams will be occluded by traditional Colliders in any case.
This property specifies if the beam should also be occluded by Triggers or not.
Min Occluder Area
Minimum 'area' of the collider to become an occluder.
Colliders smaller than this value will not block the beam.
Update Rate
Update Rate
How often will the occlusion be processed?
Try to update the occlusion as rarely as possible to keep good performance.
- Never: The occlusion will never be updated.
The only way to update it is to manually call 'ProcessOcclusionManually()' from script whenever you need. - OnEnable: The occlusion will only be updated once on start, and each time the beam is enabled/activated (after being disabled/deactivated).
It's suitable for static beams located in static environment. - OnBeamMove: The occlusion will only be updated when the beam will move.
It's suitable for moving beams located in static environment. - EveryXFrames: The occlusion will be updated every X frame(s).
It's suitable for static beams located in moving environment. - OnBeamMoveAndEveryXFrames: The occlusion will be updated when the beam will move in addition to every X frame(s).
It's suitable for moving beams located in moving environment.
X frames to wait
How many frames we wait between 2 occlusion tests?
- If you want your beam to be super responsive to the changes of your environment, update it every frame by setting 1.
- If you want to save on performance, we recommend to wait few frames between each update by setting a higher value. For example with the value 3, the system will perform 1 occlusion test every 3 frames.
Occluder Surface
Min Occluded Percentage
Approximated percentage of the beam to collide with the surface in order to be considered as occluder.
The value can be set between 50% and 100%. Default value is 50%.
 |
 |
|---|---|
| Min % < 60% => the beam is occluded | Min % > 60% => the beam is not occluded |
Max Angle
Max angle (in degrees) between the beam and the surface in order to be considered as occluder.
This property has been designed to prevent the beam from being occluded by a wall if it passes near it almost alongside the surface.
Default value is 75 degrees.
Clipping Plane
Alignment
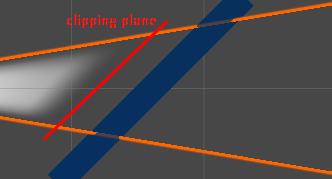
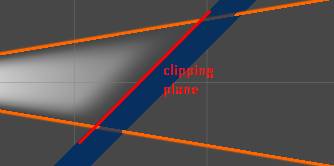
Alignment of the computed clipping plane:
- Surface: align to the surface normal which blocks the beam. Works better for large occluders such as floors and walls.
- Beam: keep the plane aligned with the beam direction. Works better with more complex occluders or with corners.
 |
 |
|---|---|
| Surface | Beam |
Which alignment should I use?
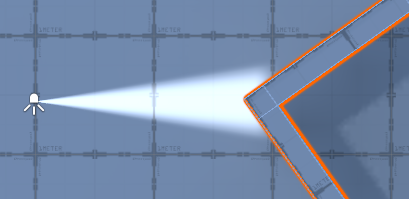
If your light beam will be occluded by concave geometry (your light beam is inside a closed room, and you want to prevent the beam from shining through the walls), using the Surface alignment should provide the best result.
If your light beam will be occluded by convex geometry (like furniture, or a wall corner), it's probably best to use the Beam alignment with a slight positive Offset Units:
Offset Units
Apply a translation to the plane. We recommend to set a small positive offset in order to handle non-flat and complex surfaces better (as long as your occluders are not super thin walls).
 |
 |
 |
|---|---|---|
| -0.25 | 0.0 | +0.5 |
Fade Distance Units
Fade out the beam before the occlusion surface in order to soften the transition.
 |
 |
|---|---|
| 0.25 | 1.0 |
Editor Debug
Show Debug Plane
Draw debug information on the scene view to show the virtual clipping plane.
Update in Editor
Perform occlusion tests and raycasts in Editor.